SpringBoot详解
SpringBoot详解
1、简介
什么是Spring
Spring是一个开源的框架,主要是用来简化开发流程
Spring是如何简化Java开发
- 基于POJO的轻量级和最小侵入性编程
- 通过IOC,依赖注入(DI)和面向接口实现松耦合
- 基于切面(AOP)和惯例进行声明式编程
- 通过切面和模板减少样式的代码
1.1、
微服务是一种架构,他要求我们在开发应用的时候,这个应用必须构建成一系列小服务的组合:可以通过Http(rpc)的方式进行互通。
2、第一个SpringBoot程序
环境的依赖 java1.8、maven3.6.1,SpringBoot:最新版 IDEA
	@RestController
public class Hello {
 @RequestMapping("/hello")
 public String getHello(){
 return "Hello SpringBoot";
 }
}
- 1
- 2
- 3
- 4
- 5
- 6
- 7
- 8
pom.xml
- spring-boot-dependencies:核心依赖在父工程里面
- 我们在写或者引入一些SpringBoot依赖的时候,不需要指定版本
启动器
	 <dependency>
 <groupId>org.springframework.boot</groupId>
 <artifactId>spring-boot-starter</artifactId>
</dependency>
- 1
- 2
- 3
- 4
- 启动器:说白了就是SpringBoot启动的场景
- 比如Spring-boot-srarter-web,他会帮助我们自动导入web环境所有的依赖
- SpringBoot会将所有的功能场景,都变成一个个的启动器
- 我们需要使用的功能,只需要找到他们的启动器便可以进行使用
主程序
	@SpringBootApplication //标注这个类是一个Spring Boot类
public class DemoApplication {
 public static void main(String[] args) {
 SpringApplication.run(DemoApplication.class, args);
 }
}
- 1
- 2
- 3
- 4
- 5
- 6
- 7
- 8
常见的注解
	@SpringBootConfiguration :表示Spring Boot的配置
 @Configuration:表是Spring的配置类
 @Component:说明这也是一个Spring的组件

@EnableAutoConfiguration:表示自动配置
 @AutoConfigurationPackage:自动配置包
 @Import(AutoConfigurationPackageRegistrar.class):自动配置包注册
 @Import(AutoConfigurationImportSelector.class):自动导入选择
- 1
- 2
- 3
- 4
- 5
- 6
- 7
- 8
- 9
结论:springBoot所有自动配置都是在启动的时候扫描并加载,Spring.factories所有的自动配置类都在这里面,但是不一定失效,要判断条件四否成立,只要导入对应的start,就有对应的启动器了,有了启动器,我们自动装配就会生效。然后就是配置成功!
- springBoot在启动的时候,从类路径下/META-INF/spring.factories获取指定值;
- 将这些自动配置的类导入容器,自动配置就会生效,帮我们进行自动配置
- spring boot现在将自动配置文件
- 整合jaavEE,解决方案和自动配置的东西都在spring-boot-autorconfigure-2.20.RELEASE.jar这个包下
- 他会把所有需要导入的组件,以类名的方式返回,这些组件就会被添加到容器
- 容器中也会存在非常多的xxxautoConfiguration的文件,就是这些类给容器中导入这个场景所需要的组件并进行自动的配置,@Configuration ,javaConfig!
- 有了自动配置类,免去了手动编写配置文件的工作
SpringBoot谈谈自己的理解
- 自动装配
- run()方法,其所作的事情
- 推断应用的类型是普通的项目还是web项目
- 查找并加载所有可用的初始化器,设置到initializers属性中
- 找出所有的应用程序监听器,设置到listeners属性中
- 推断并设置main方法的定义类,找到运行的主类
3、给属性赋值的集中方式
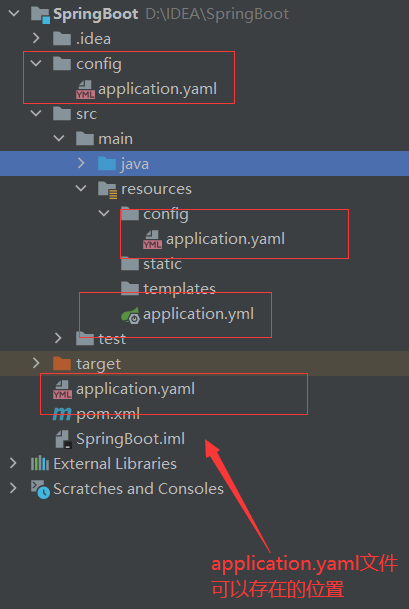
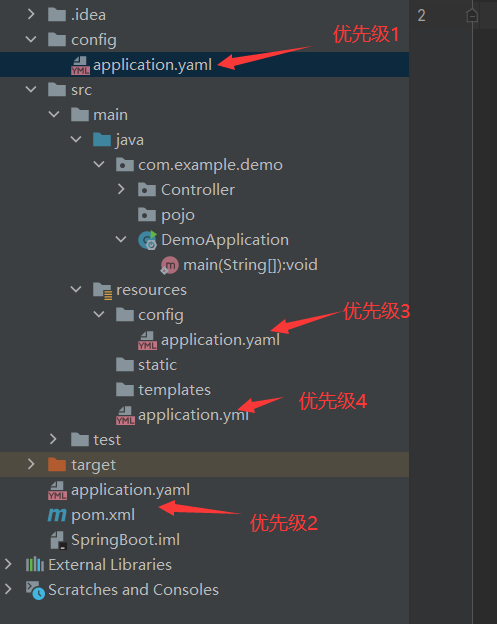
3.1、配置文件
SpringBoot使用一个全局的配置文件 , 配置文件名称是固定的
- application.properties
-
- 语法结构 :key=value
- application.yml
-
- 语法结构 :key:空格 value
**配置文件的作用 :**修改SpringBoot自动配置的默认值,因为SpringBoot在底层都给我们自动配置好了;
比如我们可以在配置文件中修改Tomcat 默认启动的端口号!测试一下!
3.2、yaml概述
YAML是 “YAML Ain’t a Markup Language” (YAML不是一种标记语言)的递归缩写。在开发的这种语言时,YAML 的意思其实是:“Yet Another Markup Language”(仍是一种标记语言)
*这种语言以数据***作**为中心,而不是以标记语言为重点!
以前的配置文件,大多数都是使用xml来配置;比如一个简单的端口配置,我们来对比下yaml和xml
传统xml配置:
	<server>
 <port>8081<port>
</server>
- 1
- 2
- 3
yaml配置:
	server:
 prot: 8080
- 1
- 2
3.3、yaml基础语法
注:yaml的语法要求十分严格,必须按照其中的规范进行编写
- 空格不能省略
- 以缩进来控制层级关系,只要是左边对齐的一列数据都是同一个层级的
- 属性和值的大小写都是十分的敏感的
字面量:普通的值[数字、布尔值、字符串]
字面量直接写在后面的可以,字符串默认不用加上双引号或者是单引号
K:v
- 1
注意:
-
""双引号,不会转义字符串里面的特殊字符,特殊字符会作为本身想表示的意思
例:name: “kuang \n shen” 输出 :kuang 换行 shen
-
‘’ 单引号,会转义特殊字符 , 特殊字符最终会变成和普通字符一样输出
例:name: ‘kuang \n shen’ 输出 :kuang \n shen
对象、map(键值对)
	#对象、map格式
k:
	v1:
	v2:
- 1
- 2
- 3
- 4
	#注:在使用的配置文件是yaml时,空格一定不能省略
student:
	name: lisi
	age: 3
- 1
- 2
- 3
- 4
行内写法
student: {name: lisi,age: 3}
- 1
数组
	pets:
	- cat
	- dog
	- pig
- 1
- 2
- 3
- 4
行内的写法
	server:
	port: 8081
- 1
- 2
yaml文件的强大在于,它可以给我们的实体类直接注入匹配的值
4、Spring boot的配置
yaml可以直接给实体类进行赋值
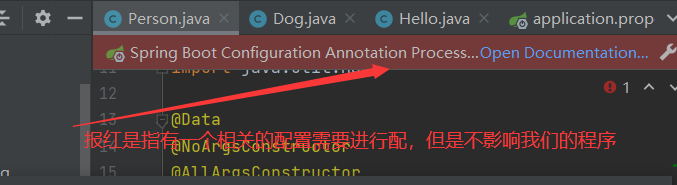
报红解决的办法
	<dependency>
 <groupId>org.springframework.boot</groupId>
 <artifactId>spring-boot-configuration-processor</artifactId>
 <optional>true</optional>
</dependency>
- 1
- 2
- 3
- 4
- 5
在pom.xml文件中添加上述的依赖
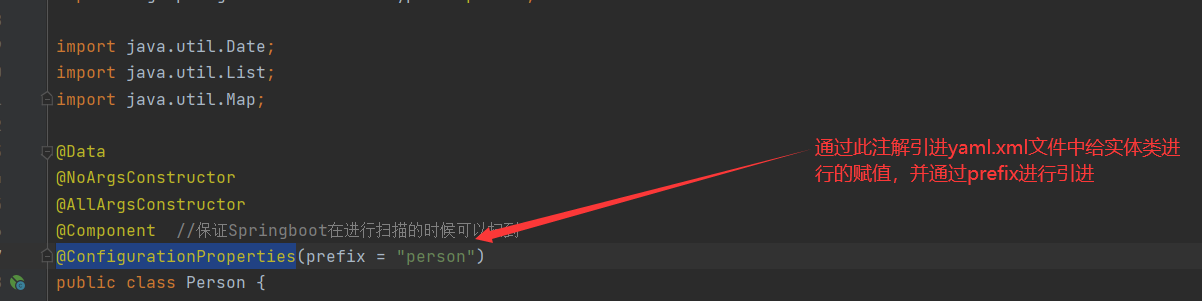
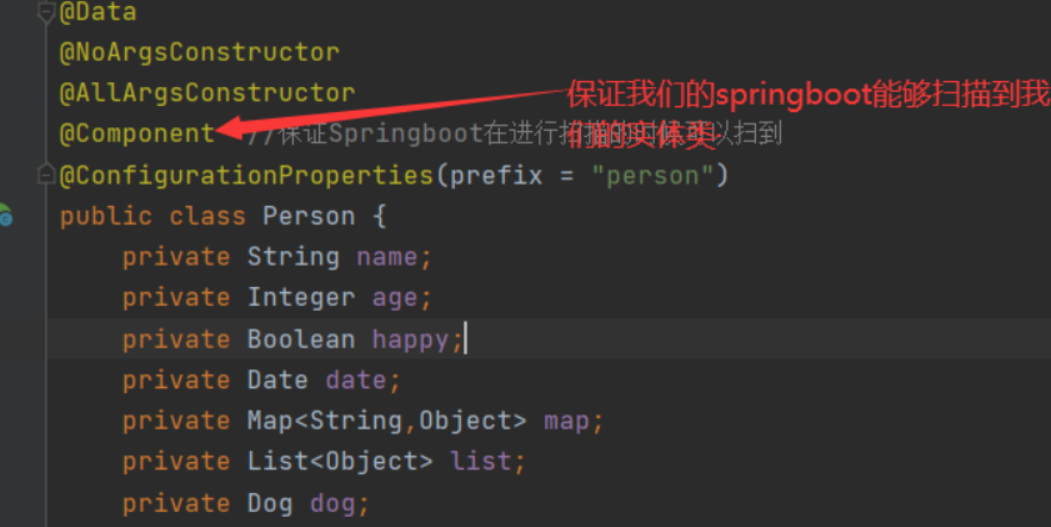
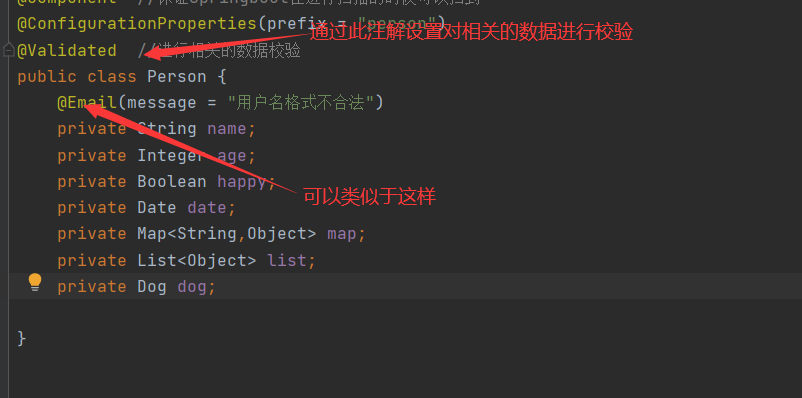
@ConfigurationProperties(prefix = “person”)的作用
-
将配置文件中配置的每一个属性的值,映射到组件之中;
-
告诉Springboot将本类中的所有属性和配置文件相关的配置进行绑定
-
参数prefix=”person“:将配置文件中person下面所有的属性一一对应
-
只有这个组件时容器中的组件,才能使用容器提供的ConfigurationProperties功能
yaml与properties的比较
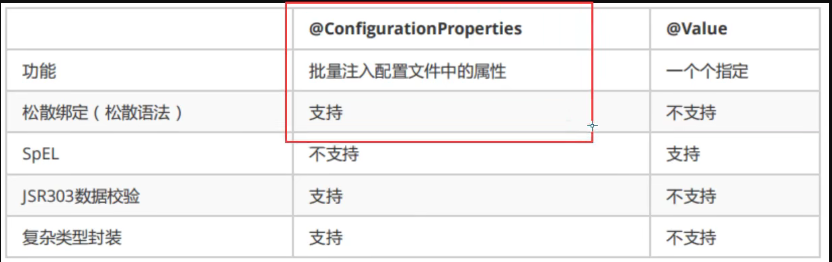
- 松散绑定:指的是在yaml中的属性的名称可以与实体类中的属性名称不是完全的一样,但是也可以对其进行赋值
- JSR303数据校验,这个是我们可以在字段是增加一层过滤器,来保证数据的合法性
- 复杂类型的封装,yaml中可以封装对象,使用@value就不支持
结论
- 配置yaml课配置properties都可以获取到值
- 如果我们在某个业务中,只需要配置文件中的某个值的时候我们可以考虑曹勇value
- 如果说,我们专门编写了一个javaBean来和配置文件进行映射,就直接使用@ConfigurationProperties
注:建议在以后的编程的时候使用yaml格式,能够做到根据不同的场合进行采取不同的写法
5、JSR303
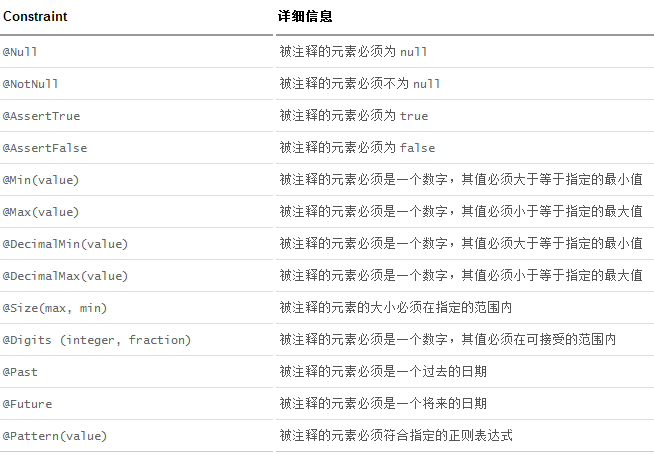
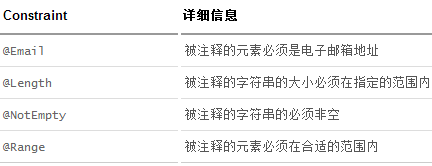
JSR303中用到的注解
	@NotNull(message="名字不能为空")
private String userName;
@Max(value=120,message="年龄最大不能查过120")
private int age;
@Email(message="邮箱格式错误")
private String email;
空检查
@Null 验证对象是否为null
@NotNull 验证对象是否不为null, 无法查检长度为0的字符串
@NotBlank 检查约束字符串是不是Null还有被Trim的长度是否大于0,只对字符串,且会去掉前后空格.
@NotEmpty 检查约束元素是否为NULL或者是EMPTY.

Booelan检查
@AssertTrue 验证 Boolean 对象是否为 true
@AssertFalse 验证 Boolean 对象是否为 false

长度检查
@Size(min=, max=) 验证对象(Array,Collection,Map,String)长度是否在给定的范围之内
@Length(min=, max=) string is between min and max included.
日期检查
@Past 验证 Date 和 Calendar 对象是否在当前时间之前
@Future 验证 Date 和 Calendar 对象是否在当前时间之后
@Pattern 验证 String 对象是否符合正则表达式的规则
.......等等
除此以外,我们还可以自定义一些数据校验规则

- 1
- 2
- 3
- 4
- 5
- 6
- 7
- 8
- 9
- 10
- 11
- 12
- 13
- 14
- 15
- 16
- 17
- 18
- 19
- 20
- 21
- 22
- 23
- 24
- 25
- 26
- 27
- 28
6、Spring Boot的文件的配置
6.1、SpringBoot的多环境配置
通过properties文件进行多环境的配置
注:根据开发的需要,可能需要多个配置文件以及端口,我们可以通过设置多个properties文件进行分开测试

通过yaml文件进行多环境的配置
	server:
 port: 8081
#选择要激活那个环境块
spring:
 profiles:
 active: prod
---
server:
 port: 8083
spring:
 profiles: dev #配置环境的名称
---
server:
 port: 8084
spring:
 profiles: prod #配置环境的名称
- 1
- 2
- 3
- 4
- 5
- 6
- 7
- 8
- 9
- 10
- 11
- 12
- 13
- 14
- 15
- 16
- 17
- 18
- 19
- 20
注:如果yml和properties同时都配置了端口,并且没有激活其他环境 , 默认会使用properties配置文件的
7、自动配置原理在理解
7.1、配置文件可以写的配置
自动装配的原理
- SpringBoot启动会加载大量的自动加载类
- 我们看我们需要的功能有没有在SpringBoot中默认写好的自动配置类当中
- 我们再来看这个的自动配置类中到底配置了那些组件(只要我们要用的组件存在其中,我们就不需要在手动配置了)
- 给容器中自动配置类添加组件的时候,会从properties类中获取某些属性,。我们只需要在配置文件中指定这些属性即可
- xxxAutoConfiguration:自动配置类;给容器添加组件
- xxxxProperties:封装配置文件中的相关的属性
8、SPringBoot Web开发
注:Spring boot最主要的特点便是自动装配
SpringBoot帮我们配置的东西(是否可以修改)
- xxxAutoConfiguration:自动配置类;给容器添加组件
- xxxxProperties:自动配置类,装配文件中自己配置的一些类
web开发需解决的问题
- 导入相关的静态资源…
- 自己创建首页
- jsp、模板引擎Thymeleaf
- 装配扩展SpringMVC
- 数据库的增删改查
- 拦截器
- 国际化!
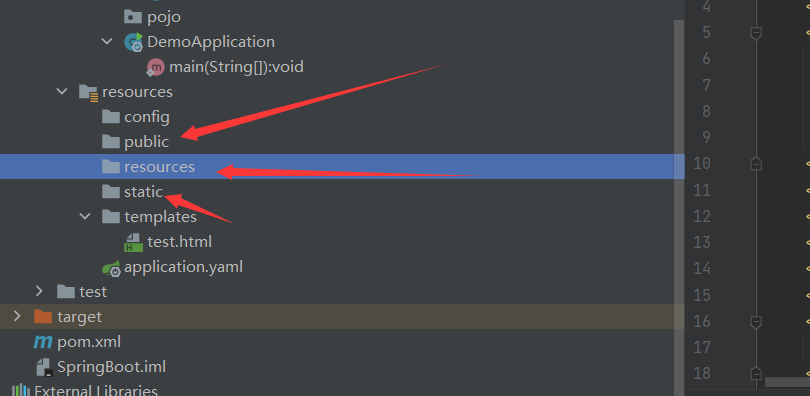
8.1、静态资源
总结:
- 在SpringBoot,我们可以使用以下方式进行处理静态资源
- webjars
- public,static,/**, resources ,localhost:8080/
- 优先级:resources>static(默认)>public
8.2、thymeleaf模板引擎(freemarker或者thymeleaf)
模板引擎
thymeleaf模板引擎:类似于jsp文件,对相关的静态的HTML文件进行相关的处理,使其能够进行数据的接收
thymeleaf模板引擎所需要的maven依赖
	<dependency>
 <groupId>org.thymeleaf</groupId>
 <artifactId>thymeleaf</artifactId>
</dependency>
<dependency>
 <groupId>org.thymeleaf</groupId>
 <artifactId>thymeleaf-spring4</artifactId>
 <version>3.0.12.RELEASE</version>
</dependency>
<dependency>
 <groupId>org.springframework.boot</groupId>
 <artifactId>spring-boot-starter-thymeleaf</artifactId>
</dependency>
- 1
- 2
- 3
- 4
- 5
- 6
- 7
- 8
- 9
- 10
- 11
- 12
- 13
注:在进行thymeleafmaven依赖引进的时候,注意版本,SpringBoot2.0+采用的thymeleaf的版本为3.0+、当SpringBoot1.0+的时候我们所需要的maven的依赖为2.0+
HTML文件存放的位置
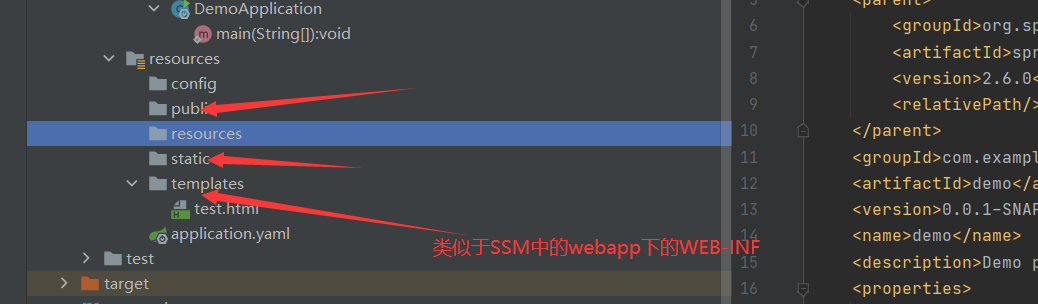
注:在templates下的HTML文件需要必须通过Controller进行相关的跳转
HTML接收数据
	<!DOCTYPE html>
<html lang="en" xmlns:th="http://www.thymeleaf.org">
<head>
 <meta charset="UTF-8">
 <title>Title</title>
</head>
<body>
<h1>你好世界</h1>
<!--通过th:进行对标签内部的属性进行绑定-->
<div th:text="${msg}" style="color:red;"></div>
</body>
</html>
- 1
- 2
- 3
- 4
- 5
- 6
- 7
- 8
- 9
- 10
- 11
- 12
注:当进行数据读取的时候,需要在开头引入相关的配置
<html lang="en" xmlns:th="http://www.thymeleaf.org">
- 1
第一个前后端的信息的交互
后端写法
	package com.example.demo.Controller;
import org.springframework.stereotype.Controller;
import org.springframework.ui.Model;
import org.springframework.web.bind.annotation.RequestMapping;
@Controller
public class testController {
 @RequestMapping("/test")
 public String test(Model model){
 model.addAttribute("msg","你好世界");
 return "test";
 }
}
- 1
- 2
- 3
- 4
- 5
- 6
- 7
- 8
- 9
- 10
- 11
- 12
- 13
- 14
- 15
- 16
前端写法
	<!DOCTYPE html>
<html lang="en" xmlns:th="http://www.thymeleaf.org">
<head>
 <meta charset="UTF-8">
 <title>Title</title>
</head>
<body>
<h1>你好世界</h1>
<!--通过th:进行对标签内部的属性进行绑定-->
<div th:text="${msg}" style="color:red;"></div>
</body>
</html>
- 1
- 2
- 3
- 4
- 5
- 6
- 7
- 8
- 9
- 10
- 11
- 12
8.3、thymeleaf的语法格式
遍历文件
	package com.example.demo.Controller;
import org.springframework.stereotype.Controller;
import org.springframework.ui.Model;
import org.springframework.web.bind.annotation.RequestMapping;
import java.util.Arrays;
@Controller
public class testController {
 @RequestMapping("/test")
 public String test(Model model){
 model.addAttribute("msg","你好世界");
//Arrays.asList将文件返回一个集合
 model.addAttribute("user", Arrays.asList("李四","张三"));
 return "test";
 }
}
- 1
- 2
- 3
- 4
- 5
- 6
- 7
- 8
- 9
- 10
- 11
- 12
- 13
- 14
- 15
- 16
- 17
- 18
- 19
- 20
<!DOCTYPE html>
<html lang="en" xmlns:th="http://www.thymeleaf.org">
<head>
 <meta charset="UTF-8">
 <title>Title</title>
</head>
<body>
<h1>你好世界</h1>
<!--通过th:进行对标签内部的属性进行绑定-->
<div th:text="${msg}" style="color:red;"></div>
<h3 th:each="user1:${user}" th:text="${user1}"></h3>
</body>
</html>
- 1
- 2
- 3
- 4
- 5
- 6
- 7
- 8
- 9
- 10
- 11
- 12
- 13
- 14
- 15

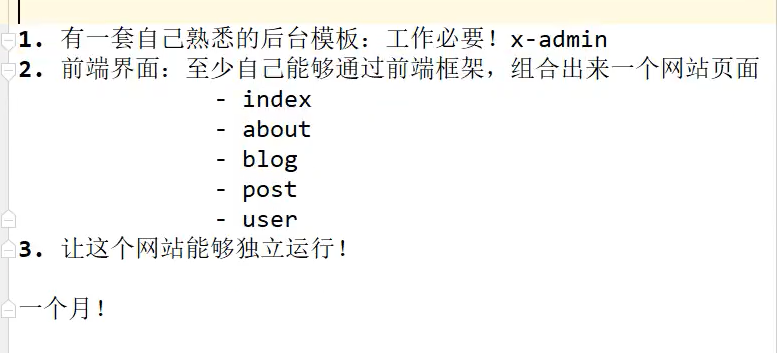
9、网站的搭建
10、SpringBoot连接数据库
10.1、第一个连接数据库的项目
yaml文件中的配置
	spring:
 datasource:
 username: root
 password: lyj18366635303
 url: jdbc:mysql://localhost:3306/test?useUnicode=true&characterEncoding=utf8&serverTimezone=GMT%2B8&useSSL=false
 driver-class-name: com.mysql.cj.jdbc.Driver
#设置端口号
server:
 port: 8090
- 1
- 2
- 3
- 4
- 5
- 6
- 7
- 8
- 9
- 10
- 11
进行java测试
package com.li.inspur.controller;
import org.springframework.beans.factory.annotation.Autowired;
import org.springframework.jdbc.core.JdbcTemplate;
import org.springframework.web.bind.annotation.*;
import java.util.List;
import java.util.Map;
@RestController
public class testController {
@Autowired
JdbcTemplate jdbcTemplate;
@RequestMapping("/select")
@ResponseBody
public String selectUser(){
String sql="select * from student";
List<Map<String, Object>> maps = jdbcTemplate.queryForList(sql);
for (Map<String, Object> map : maps) {
System.out.println(map);
}
return "ok";
}
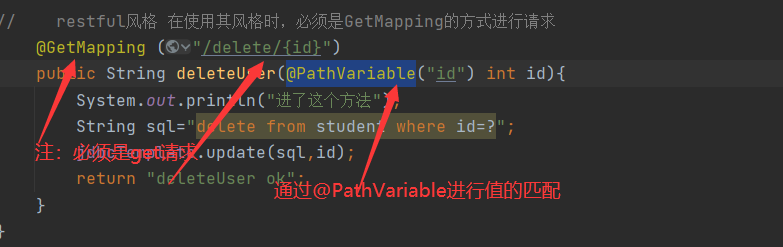
// restful风格 在使用其风格时,必须是GetMapping的方式进行请求
@GetMapping ("/delete/{id}")
public String deleteUser(@PathVariable("id") int id){
System.out.println("进了这个方法");
String sql="delete from student where id=?";
jdbcTemplate.update(sql,id);
return "deleteUser ok";
}
}
- 1
- 2
- 3
- 4
- 5
- 6
- 7
- 8
- 9
- 10
- 11
- 12
- 13
- 14
- 15
- 16
- 17
- 18
- 19
- 20
- 21
- 22
- 23
- 24
- 25
- 26
- 27
- 28
- 29
- 30
- 31
- 32
- 33
注:在使用restful风格进行传输数据的时候,请求方式必须是GET方式进行请求,必须通过@PathVariable进行对传输的数据进行一一对应
10.2、整合Druid数据源
Druid简介
Druid是阿里巴巴开源平台上一个数据连接池实现,结合了C3p0、DBCP、PROXOOL等DB池的优点,同时加入了日志的监控
Druid可以很好的监控DB池连接和SQL的执行情况,天生就是针对监控而生的DB连接池。
SpringBoot2.0以上默认使用HiKari数据源,可以说HiKari与Druid都是当前javaweb上最优秀的数据源。
com.alibaba.druid.pool.DruidDataSource 基本配置参数如下:
参考网站:https://www.cnblogs.com/melodyjerry/p/13762822.html#8springboot%E6%95%B4%E5%90%88druid
所需要的maven依赖
	<dependency>
 <groupId>com.alibaba</groupId>
 <artifactId>druid</artifactId>
 <version>1.1.12</version>
</dependency>
- 1
- 2
- 3
- 4
- 5
druid文件的配置
	spring:
 datasource:
 username: root
 password: lyj18366635303
 url: jdbc:mysql://localhost:3306/test?useUnicode=true&characterEncoding=utf8&serverTimezone=GMT%2B8&useSSL=false
 driver-class-name: com.mysql.cj.jdbc.Driver
 type: com.alibaba.druid.pool.DruidDataSource
 #Spring Boot 默认是不注入这些属性值的,需要自己绑定
 #druid 数据源专有配置
 initialSize: 5
 minIdle: 5
 maxActive: 20
 maxWait: 60000
 timeBetweenEvictionRunsMillis: 60000
 minEvictableIdleTimeMillis: 300000
 validationQuery: SELECT 1 FROM DUAL
 testWhileIdle: true
 testOnBorrow: false
 testOnReturn: false
 poolPreparedStatements: true
 #配置监控统计拦截的filters,stat:监控统计、log4j:日志记录、wall:防御sql注入
 #如果允许时报错 java.lang.ClassNotFoundException: org.apache.log4j.Priority
 #则导入 log4j 依赖即可,Maven 地址:https://mvnrepository.com/artifact/log4j/log4j
 filters: stat,wall,log4j
 maxPoolPreparedStatementPerConnectionSize: 20
 useGlobalDataSourceStat: true
 connectionProperties: druid.stat.mergeSql=true;druid.stat.slowSqlMillis=500
- 1
- 2
- 3
- 4
- 5
- 6
- 7
- 8
- 9
- 10
- 11
- 12
- 13
- 14
- 15
- 16
- 17
- 18
- 19
- 20
- 21
- 22
- 23
- 24
- 25
- 26
- 27
- 28
- 29
设置后台的检测器
	package com.li.inspur.config;
import com.alibaba.druid.pool.DruidDataSource;
import com.alibaba.druid.support.http.StatViewServlet;
import com.alibaba.druid.support.http.WebStatFilter;
import org.springframework.boot.context.properties.ConfigurationProperties;
import org.springframework.boot.web.servlet.FilterRegistrationBean;
import org.springframework.boot.web.servlet.ServletRegistrationBean;
import org.springframework.context.annotation.Bean;
import org.springframework.context.annotation.Configuration;
import javax.servlet.Filter;
import javax.servlet.ServletRegistration;
import javax.sql.DataSource;
import java.util.HashMap;
@Configuration
public class DruidConfig {
 @ConfigurationProperties(prefix = "spring.datasource")
 @Bean
 public DataSource druidDataSource(){
 return new DruidDataSource();
 }
// 设置后台监控 类似与web.xml
 @Bean
 public ServletRegistrationBean statViewServlet(){
 ServletRegistrationBean<StatViewServlet> statViewServletServletRegistrationBean = new ServletRegistrationBean<>(new StatViewServlet(), "/druid/*");
// 后台需要有人登录,需要账号密码
 HashMap<String,String> hashMap=new HashMap<>();
// 登录的key是固定的参数
 hashMap.put("loginUsername","admin");
 hashMap.put("loginPassword","admin");
// 允许谁能访问
 hashMap.put("allow","");//表示所有人都可以访问
// 禁止谁能访问
// hashMap.put("lisi","10.64.27.3");
 statViewServletServletRegistrationBean.setInitParameters(hashMap);
 return statViewServletServletRegistrationBean;
 }
// 设置过滤器
 @Bean
 public FilterRegistrationBean webStatFilter(){
 FilterRegistrationBean<Filter> filterFilterRegistrationBean = new FilterRegistrationBean<>();
// 设置过滤器
 filterFilterRegistrationBean.setFilter(new WebStatFilter());
// 可以过滤的请求
 HashMap hashMap=new HashMap();
// 表示这些东西不进行统计~
 hashMap.put("exclusions","*.js,*.css,/druid/*");
 filterFilterRegistrationBean.setInitParameters(hashMap);
 return filterFilterRegistrationBean;
 }
}
- 1
- 2
- 3
- 4
- 5
- 6
- 7
- 8
- 9
- 10
- 11
- 12
- 13
- 14
- 15
- 16
- 17
- 18
- 19
- 20
- 21
- 22
- 23
- 24
- 25
- 26
- 27
- 28
- 29
- 30
- 31
- 32
- 33
- 34
- 35
- 36
- 37
- 38
- 39
- 40
- 41
- 42
- 43
- 44
- 45
- 46
- 47
- 48
- 49
- 50
- 51
- 52
- 53
- 54
- 55
- 56
- 57
- 58
- 59
10.3、SpringBoot整合Mybatis
整合需要的包(mybatis-spring-boot-start)
	<dependency>
 <groupId>org.mybatis.spring.boot</groupId>
 <artifactId>mybatis-spring-boot-starter</artifactId>
 <version>2.2.0</version>
</dependency>
- 1
- 2
- 3
- 4
- 5
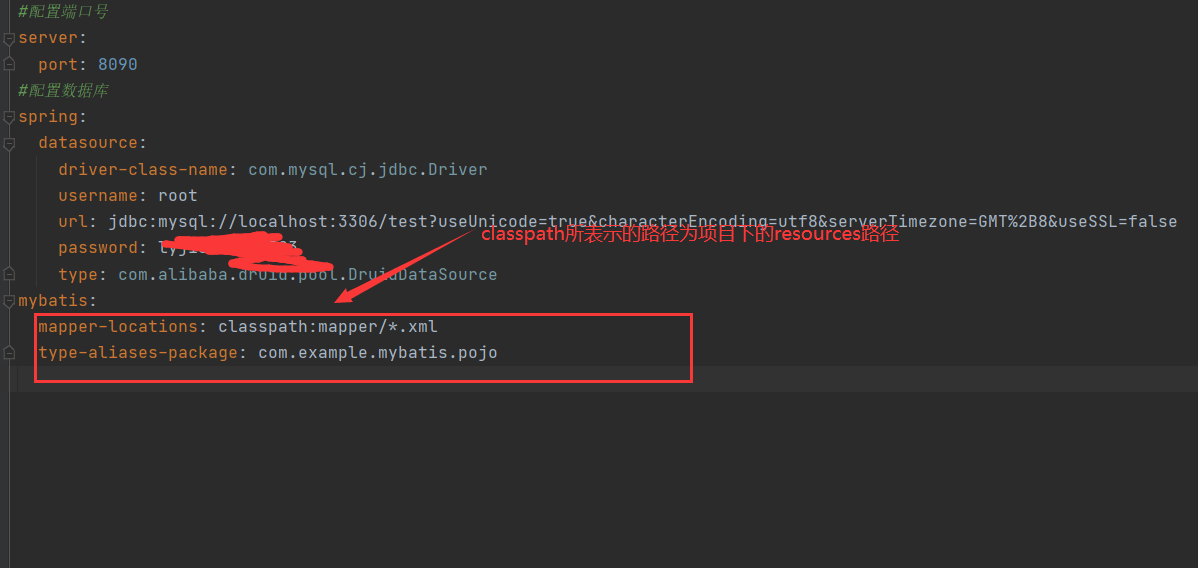
yaml文件中的配置
	#配置端口号
server:
 port: 8090
#配置数据库
spring:
 datasource:
 driver-class-name: com.mysql.cj.jdbc.Driver
 username: root
 url: jdbc:mysql://localhost:3306/test?useUnicode=true&characterEncoding=utf8&serverTimezone=GMT%2B8&useSSL=false
 password:
 type: com.alibaba.druid.pool.DruidDataSource
mybatis:
 mapper-locations: classpath:mapper/*.xml
 type-aliases-package: com.example.mybatis.pojo
- 1
- 2
- 3
- 4
- 5
- 6
- 7
- 8
- 9
- 10
- 11
- 12
- 13
- 14
- 15
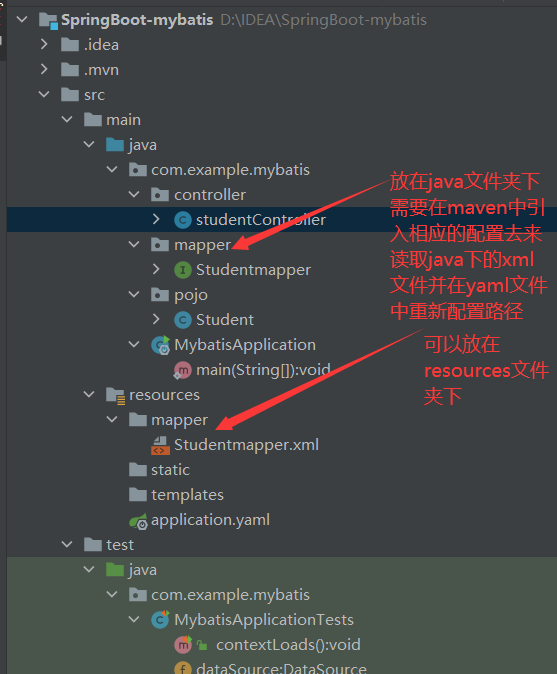
mapper.xml文件放置的位置
mapper接口的定义
	package com.example.mybatis.mapper;
import com.example.mybatis.pojo.Student;
import org.apache.ibatis.annotations.Mapper;
import org.springframework.stereotype.Repository;
import java.util.List;
@Mapper
@Repository
public interface Studentmapper {
 public List<Student> getStudentInformation();
}
- 1
- 2
- 3
- 4
- 5
- 6
- 7
- 8
- 9
- 10
- 11
- 12
- 13
注:配置不同模块的接口建议使用不同的注解
-
在配置mapper接口的时候需要的注解
-
@Mapper @Repository- 1
- 2
-
在配置mapper.xml文件的时候注意配置相关的工作空间
-
-
在配置service的接口的时候使用的注解
- 配置接口的实现类的时候使用的是@Service(接口的名字)使其对应
- 在配置接口的时候使用的是@Resource
-
在配置Controller的时候使用的注解
- @Controller或者是@RestController
- @Controller表示的是接收请求返回一个视图,但是@RestController表示的是接收请求但是返回的是一个json的字符串
10.4、SpringSecurity环境的搭建(保证环境的安全)
注:网站的安全环境是在网站的搭建的前期来进行思考的
主要的功能:认证与授权
简介:
Spring Security是针对Spring项目的安全框架,也是SpringBoot底层安全模块的默认的技术的选型,它可以实现强大的web安全控制,对于安全控制,我们仅需要引入spring-boot-starter-security模块,进行少量的配置,即可实现强大的安全管理
记住几个类
- webSecurityConfigurerAdapter:自定义Security策略
- AuthenticationManagerBuilder:自定义认证策略
- @EnableWebSecurity:开启WebSecurity模式,@Enablexxxx开启某个功能
SpringSecurity的两个主要目标是“认证和授权”(访问控制)
认证:Authentication
授权:Authorization
	package com.example.security.config;
import org.springframework.security.config.annotation.authentication.builders.AuthenticationManagerBuilder;
import org.springframework.security.config.annotation.web.builders.HttpSecurity;
import org.springframework.security.config.annotation.web.configuration.EnableWebSecurity;
import org.springframework.security.config.annotation.web.configuration.WebSecurityConfigurerAdapter;
import org.springframework.security.crypto.bcrypt.BCryptPasswordEncoder;
//表示这个类已经被Spring托管
@EnableWebSecurity
public class Security extends WebSecurityConfigurerAdapter {
// 权限的配置
 @Override
 protected void configure(HttpSecurity http) throws Exception {
// 首页所有人可以访问,但是功能页只有有权限的人才可以访问
// 链式编程
 http.authorizeRequests().antMatchers("/").permitAll()
 .antMatchers("/level1/**").hasRole("vip1");
// 在没有权限的时候会默认额跳转到登陆页面,需要爱看i其登录页面,可以进行自定义页面
 http.formLogin();
// 开启注销功能
 http.csrf().disable();//关闭csrf功能,登录失败可能存在的原因
// 开启注销功能
 http.logout();
// 开启记住我的功能,可以进行自定义
 http.rememberMe();
 }
// 用户的认证 springboot2.0.x可以直接的使用
// 密码编码:passwordEncoder
// 在Spring secutiry 5.0+新增了很多的方法
 @Override
 protected void configure(AuthenticationManagerBuilder auth) throws Exception {
// 在设置密码的时候密码必须加密,不然报错,在2.0+的版本当中
 auth.inMemoryAuthentication().passwordEncoder(new BCryptPasswordEncoder())
 .withUser("lisi").password(new BCryptPasswordEncoder().encode("123456")).roles("vip2","vip3")
 .and()
 .withUser("zhangsan").password(new BCryptPasswordEncoder().encode("23456")).roles("vip1","vip2","vip3");
 }
}
- 1
- 2
- 3
- 4
- 5
- 6
- 7
- 8
- 9
- 10
- 11
- 12
- 13
- 14
- 15
- 16
- 17
- 18
- 19
- 20
- 21
- 22
- 23
- 24
- 25
- 26
- 27
- 28
- 29
- 30
- 31
- 32
- 33
- 34
- 35
- 36
- 37
- 38
- 39
- 40
- 41
- 42
- 43
- 44
- 45
10.5、Shiro简介
定义
- Apache Shiro是一个java的安全框架
- Shiro可以非常容易的开发出足够好的应用,其既可以用在JavaSE中,也可以用在javaEE中
- Shiro可以完成,认证、授权、加密、会话管理、web集成、缓存等
shiro的三大基本对象
	1 Subject 用户
2 SecurityManager 管理所有用户
3 Realm 连接数据
- 1
- 2
- 3
所需要的maven依赖
	<dependency>
 <groupId>org.apache.shiro</groupId>
 <artifactId>shiro-spring</artifactId>
 <version>1.4.1</version>
</dependency>
- 1
- 2
- 3
- 4
- 5
或者
	 <dependency>
 <groupId>org.apache.shiro</groupId>
 <artifactId>shiro-spring-boot-web-starter</artifactId>
 <version>1.7.1</version>
</dependency>
- 1
- 2
- 3
- 4
- 5
java的实现
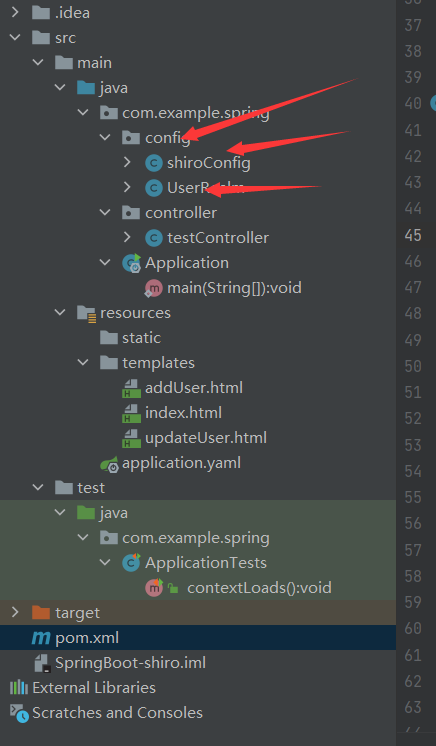
shiroConfig
	package com.example.spring.config;
import org.apache.shiro.spring.web.ShiroFilterFactoryBean;
import org.apache.shiro.web.mgt.DefaultWebSecurityManager;
import org.springframework.beans.factory.annotation.Qualifier;
import org.springframework.context.annotation.Bean;
import org.springframework.context.annotation.Configuration;
//进行配置的时候需要倒着配置
@Configuration
public class shiroConfig {
// shiroFilterFactoryBean
 @Bean
 public ShiroFilterFactoryBean shiroFilterFactoryBean(@Qualifier("defaultWebSecurityManager") DefaultWebSecurityManager defaultWebSecurityManager){
 ShiroFilterFactoryBean shiroFilterFactoryBean = new ShiroFilterFactoryBean();
 shiroFilterFactoryBean.setSecurityManager(defaultWebSecurityManager);
 return shiroFilterFactoryBean;
 }
// DefaultWebSecurityManger
 @Bean(name = "defaultWebSecurityManager")
 public DefaultWebSecurityManager defaultWebSecurityManager(@Qualifier("userRealm") UserRealm userRealm){
 DefaultWebSecurityManager defaultWebSecurityManager = new DefaultWebSecurityManager();
 defaultWebSecurityManager.setRealm(userRealm);
 return defaultWebSecurityManager;
 }
// 创建realm对象,需要自定义
 @Bean(name = "userRealm")
 public UserRealm userRealm(){
 return new UserRealm();
 }
}
- 1
- 2
- 3
- 4
- 5
- 6
- 7
- 8
- 9
- 10
- 11
- 12
- 13
- 14
- 15
- 16
- 17
- 18
- 19
- 20
- 21
- 22
- 23
- 24
- 25
- 26
- 27
- 28
- 29
- 30
- 31
- 32
- 33
- 34
UserRealm
	package com.example.spring.config;
import org.apache.shiro.authc.AuthenticationException;
import org.apache.shiro.authc.AuthenticationInfo;
import org.apache.shiro.authc.AuthenticationToken;
import org.apache.shiro.authz.AuthorizationInfo;
import org.apache.shiro.realm.AuthorizingRealm;
import org.apache.shiro.subject.PrincipalCollection;
//进行自定义realm
public class UserRealm extends AuthorizingRealm {
// 授权
 @Override
 protected AuthorizationInfo doGetAuthorizationInfo(PrincipalCollection principalCollection) {
 System.out.println("执行了授权");
 return null;
 }
// 认证
 @Override
 protected AuthenticationInfo doGetAuthenticationInfo(AuthenticationToken authenticationToken) throws AuthenticationException {
 System.out.println("执行了认证");
 return null;
 }
}
- 1
- 2
- 3
- 4
- 5
- 6
- 7
- 8
- 9
- 10
- 11
- 12
- 13
- 14
- 15
- 16
- 17
- 18
- 19
- 20
- 21
- 22
- 23
- 24
- 25
10.5.1、设置登录拦截
	package com.example.spring.config;
import org.apache.shiro.spring.web.ShiroFilterFactoryBean;
import org.apache.shiro.web.mgt.DefaultWebSecurityManager;
import org.springframework.beans.factory.annotation.Qualifier;
import org.springframework.context.annotation.Bean;
import org.springframework.context.annotation.Configuration;
import java.util.HashMap;
import java.util.LinkedHashMap;
import java.util.Map;
//进行配置的时候需要倒着配置
@Configuration
public class shiroConfig {
// shiroFilterFactoryBean
 @Bean
 public ShiroFilterFactoryBean shiroFilterFactoryBean(@Qualifier("defaultWebSecurityManager") DefaultWebSecurityManager defaultWebSecurityManager){
 ShiroFilterFactoryBean shiroFilterFactoryBean = new ShiroFilterFactoryBean();
 shiroFilterFactoryBean.setSecurityManager(defaultWebSecurityManager);
// 添加shiro的内置过滤器
 /*
 * anno:无需认证便可以访问
 * authc:必须认证才能访问
 * user:必须拥有 记住我 功能采用
 * perms:拥有对某个资源的权限才能访问
 * role:拥有某个角色的权限才可以访问
 * */
 Map<String,String> hashMap=new LinkedHashMap<>();
 hashMap.put("/add","authc");
 hashMap.put("/update","authc");
 shiroFilterFactoryBean.setLoginUrl("/login");
 shiroFilterFactoryBean.setFilterChainDefinitionMap(hashMap);
 return shiroFilterFactoryBean;
 }
// DefaultWebSecurityManger
 @Bean(name = "defaultWebSecurityManager")
 public DefaultWebSecurityManager defaultWebSecurityManager(@Qualifier("userRealm") UserRealm userRealm){
 DefaultWebSecurityManager defaultWebSecurityManager = new DefaultWebSecurityManager();
 defaultWebSecurityManager.setRealm(userRealm);
 return defaultWebSecurityManager;
 }
// 创建realm对象,需要自定义
 @Bean(name = "userRealm")
 public UserRealm userRealm(){
 return new UserRealm();
 }
}
- 1
- 2
- 3
- 4
- 5
- 6
- 7
- 8
- 9
- 10
- 11
- 12
- 13
- 14
- 15
- 16
- 17
- 18
- 19
- 20
- 21
- 22
- 23
- 24
- 25
- 26
- 27
- 28
- 29
- 30
- 31
- 32
- 33
- 34
- 35
- 36
- 37
- 38
- 39
- 40
- 41
- 42
- 43
- 44
- 45
- 46
- 47
- 48
- 49
- 50
- 51

10.5.2、shiro实现登录认证
注:用户的认证需要放在realm中
	@RequestMapping("/tologin")
 public String login( String username,String password,Model model){
 System.out.println("username=>"+username+"password=>"+password);
// 获取用户对象
 Subject subject= SecurityUtils.getSubject();
 System.out.println("获取的用户对象是"+subject.toString());
// 对其进行封装
 UsernamePasswordToken usernamePasswordToken = new UsernamePasswordToken(username, password);
 System.out.println("封装的用户的信息"+usernamePasswordToken);
// 执行登录的方法,如果没有异常说明OK了
 try{
 subject.login(usernamePasswordToken);
 return "index";
 }catch (UnknownAccountException e){
 model.addAttribute("msg","用户名错误");
 return "login";
 }catch (IncorrectCredentialsException e){
 model.addAttribute("msg","密码错误");
 return "login";
 }
 }
- 1
- 2
- 3
- 4
- 5
- 6
- 7
- 8
- 9
- 10
- 11
- 12
- 13
- 14
- 15
- 16
- 17
- 18
- 19
- 20
- 21
realm
	// 认证
 @Override
 protected AuthenticationInfo doGetAuthenticationInfo(AuthenticationToken authenticationToken) throws AuthenticationException {
 System.out.println("执行了认证");
// 设置用户名和密码,在数据库中进行搜索
 String name="root";
 String password="123456";
 UsernamePasswordToken usernamePasswordToken= (UsernamePasswordToken) authenticationToken;
 if (!usernamePasswordToken.getUsername().equals(name)){
 return null;//自动抛出异常
 }
 return new SimpleAuthenticationInfo("",password,"");
// return null;
 }
}
- 1
- 2
- 3
- 4
- 5
- 6
- 7
- 8
- 9
- 10
- 11
- 12
- 13
- 14
- 15
在进行用户认证的时候,在Controller中获取用户并进行封装之后,shiro会自动的在realm类中进行认证
10.5.3、shiro整合mybatis
	 }catch (UnknownAccountException e){
 model.addAttribute("msg","用户名错误");
 return "login";
 }catch (IncorrectCredentialsException e){
 model.addAttribute("msg","密码错误");
 return "login";
 }
}
- 1
- 2
- 3
- 4
- 5
- 6
- 7
- 8
> realm
```java
// 认证
 @Override
 protected AuthenticationInfo doGetAuthenticationInfo(AuthenticationToken authenticationToken) throws AuthenticationException {
 System.out.println("执行了认证");
// 设置用户名和密码,在数据库中进行搜索
 String name="root";
 String password="123456";
 UsernamePasswordToken usernamePasswordToken= (UsernamePasswordToken) authenticationToken;
 if (!usernamePasswordToken.getUsername().equals(name)){
 return null;//自动抛出异常
 }
 return new SimpleAuthenticationInfo("",password,"");
// return null;
 }
}
- 1
- 2
- 3
- 4
- 5
- 6
- 7
- 8
- 9
- 10
- 11
- 12
- 13
- 14
- 15
- 16
- 17
- 18
- 19
在进行用户认证的时候,在Controller中获取用户并进行封装之后,shiro会自动的在realm类中进行认证